Tomorrow is the 102nd anniversary of the Battle of Jutland, and in honor of it I’m reposting my series on the battle written last year.
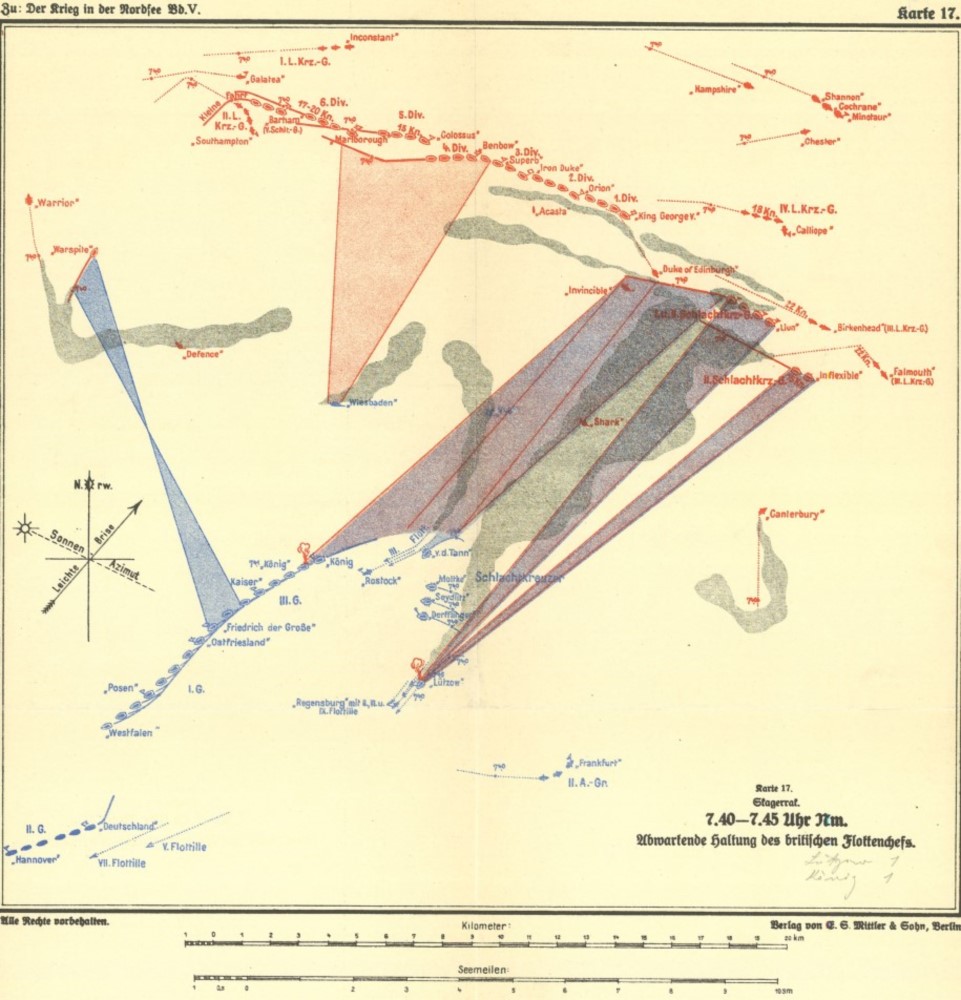
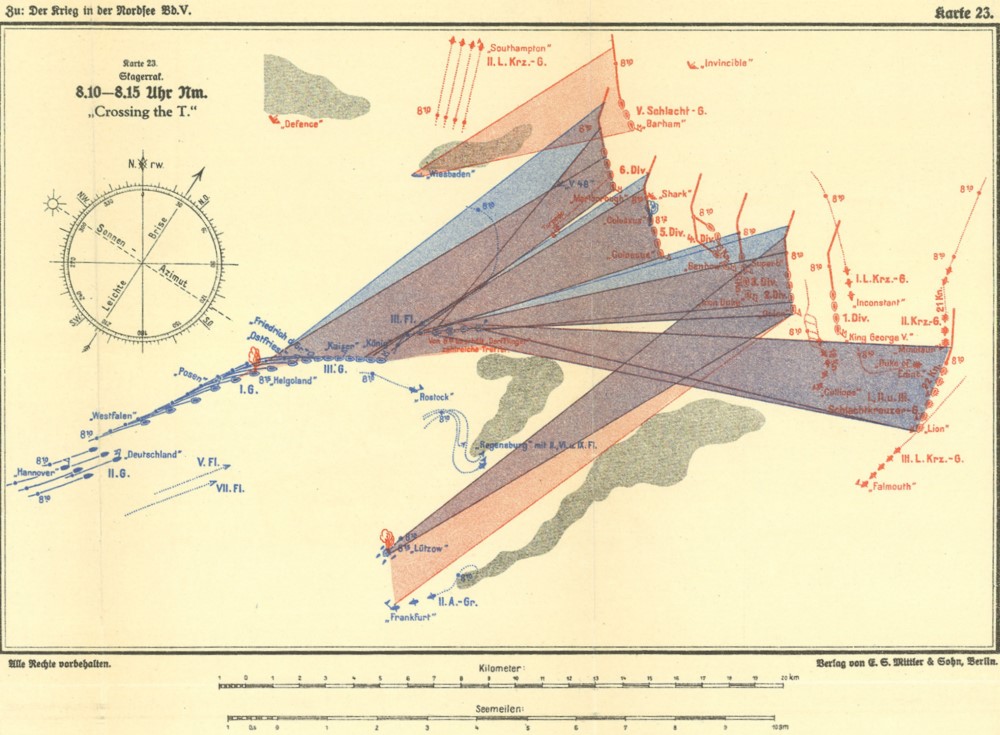
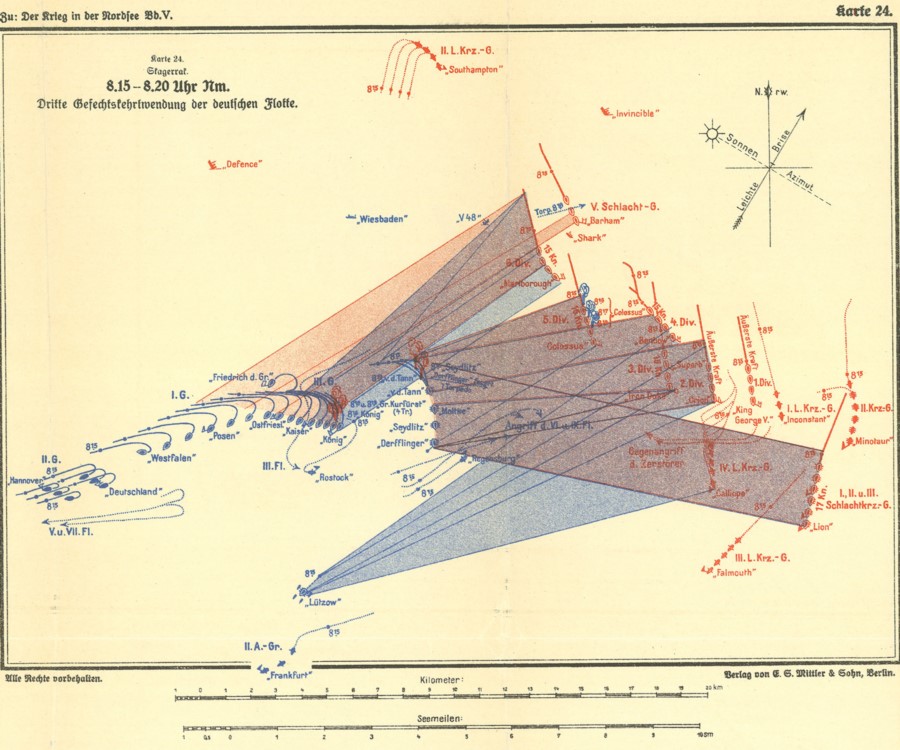
The British Grand Fleet and German High Seas Fleet had been facing off across the North Sea since the beginning of the war, but in May of 1916, they finally met in battle. The British battlecruisers under David Beatty pursued their German counterparts under Franz von Hipper south after their first encounter until they met the body of the German Fleet, commanded by Reinhard Scheer. They turned north, and lead the Germans directly into the teeth of John Jellicoe, with the British main body. Jellicoe timed his deployment to perfection, placing his line across the Germans and crossing their T. Scheer saved his force with a swift turn away.
Jutland: The end of the main fleet action
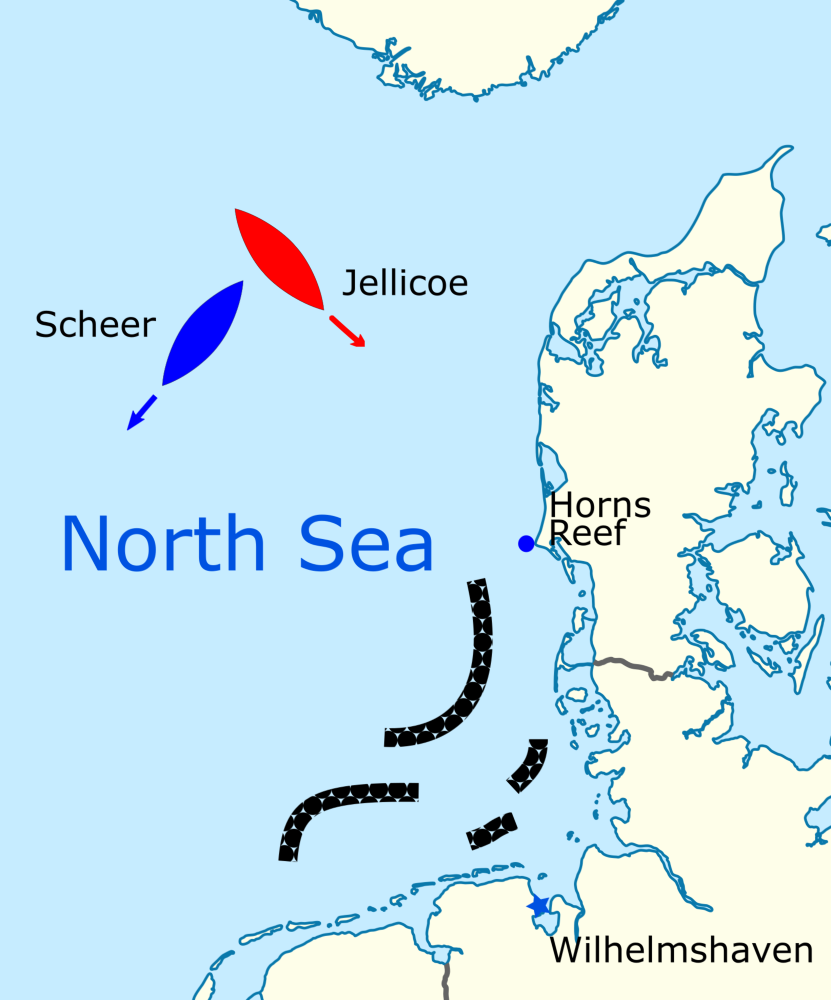
Scheer had dodged Jellicoe's trap when he turned away, but the battle wasn't over. After losing sight of Scheer, Jellicoe took his fleet south, intending to keep the Germans to the west of him, and intercept them when they tried to get home.
The situation at 1940. Dots are mines.
As can be seen on the map, the minefields laid by both sides had the Germans boxed in. Jellicoe was to the north of the direct route to the Wilhelmshaven, and pretty much directly between Scheer and the route home via Horns Reef along the coast of Denmark. If he correctly guessed which route they would take, there was no way that the Germans could escape without another fight.
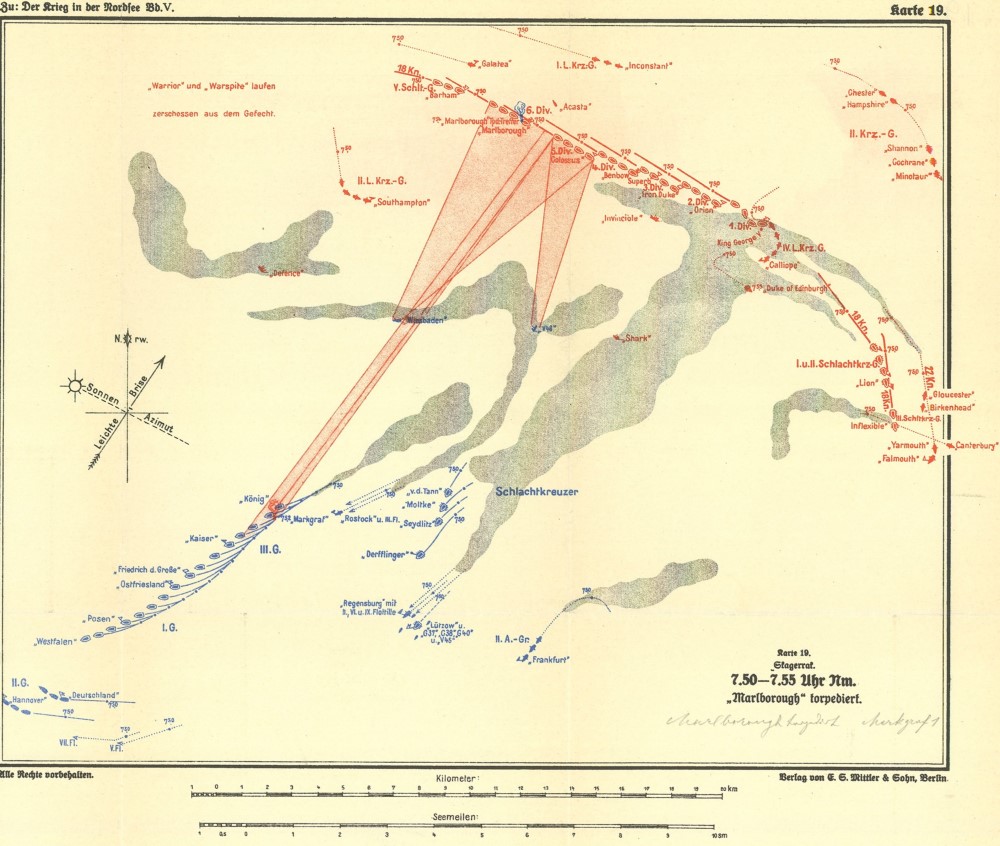
At around 1940, minutes after the German fleet disappeared, the rear battleships of Jellicoe’s line began to dodge torpedoes. At 1954, Marlborough was hit by one, launched by the Wiesbaden, which was amazingly still afloat despite the pounding she had taken. Despite the flooding through the 20-foot gash in her side, and lost the use of several of her forward boilers, Marlborough remained in the battle line, although she was limited to 16 knots instead of her normal 21. The two men killed aboard were the only casualties among the battleships of the Grand Fleet.1
Jellicoe was not well-served by his subordinates during this phase of the battle, who allowed the Germans to escape without informing Jellicoe or attempting to pursue. The one exception was William Goodenough, who we met previously as the only commander to properly report the approach of the High Seas Fleet. His 2nd Light Cruiser Squadron managed to maintain contact with their trailing units.
Beatty also declined to pursue the Germans. He instead turned in a full circle ahead of the Grand Fleet, wasting a valuable 7 minutes. In fairness, Lion apparently suffered a gyrocompass failure, but his attempts to cover it up, including producing a doctored track chart in the 1920s, do not reflect well on him.
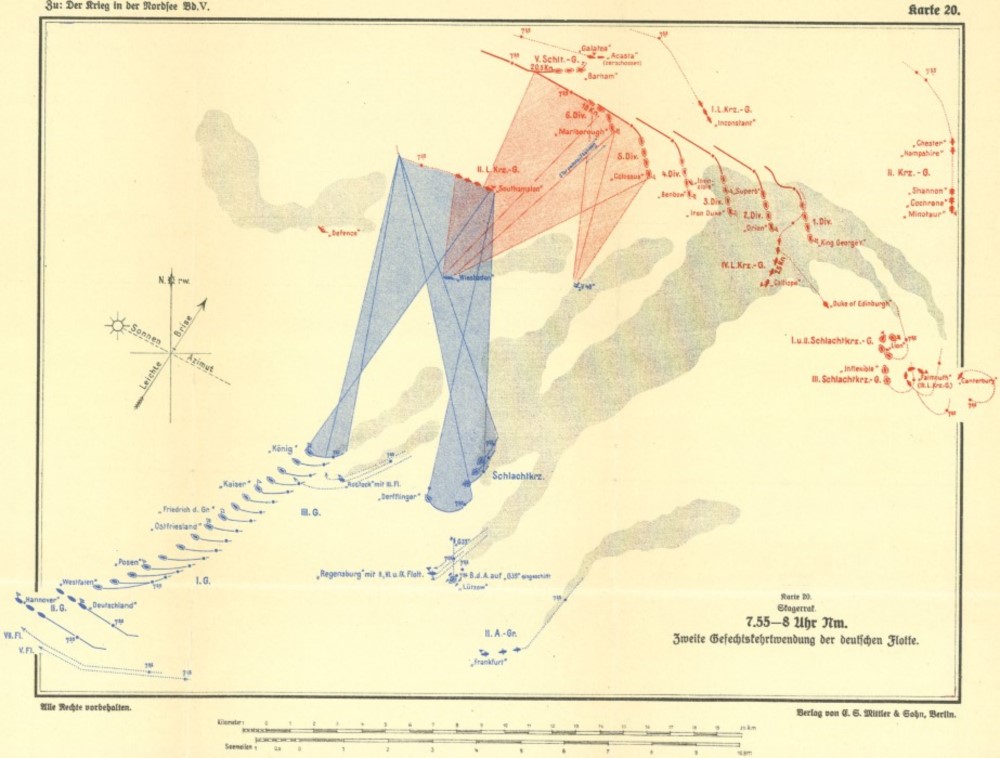
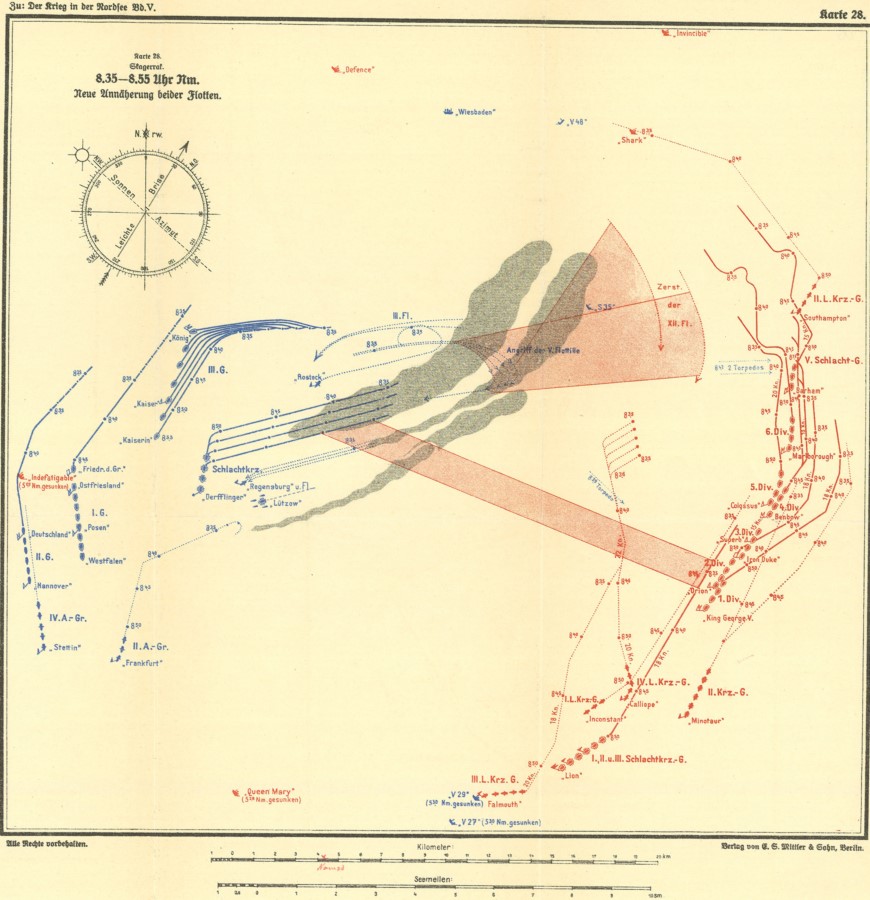
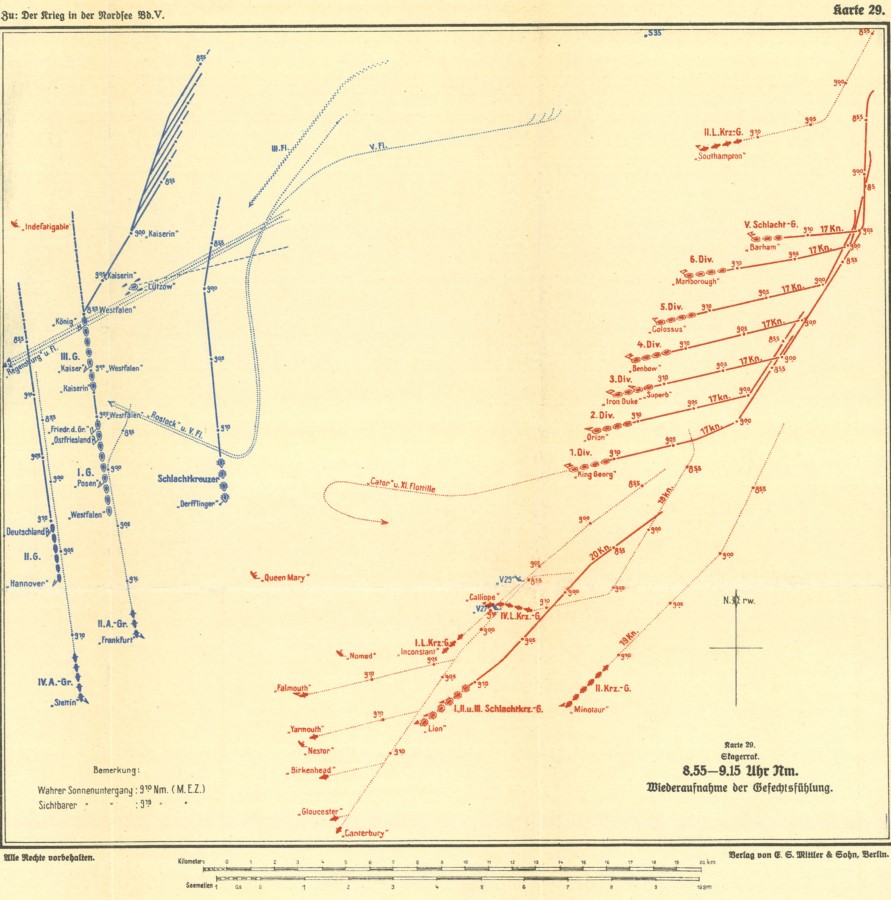
At 1955, Scheer, for reasons that are not clear, decided to turn east again. He justified this either as an attempt to surprise Jellicoe or to help Wiesbaden, but neither explanation makes much sense, particularly as he put the battlecruisers, lightly armed and heavily damaged, in the van.2
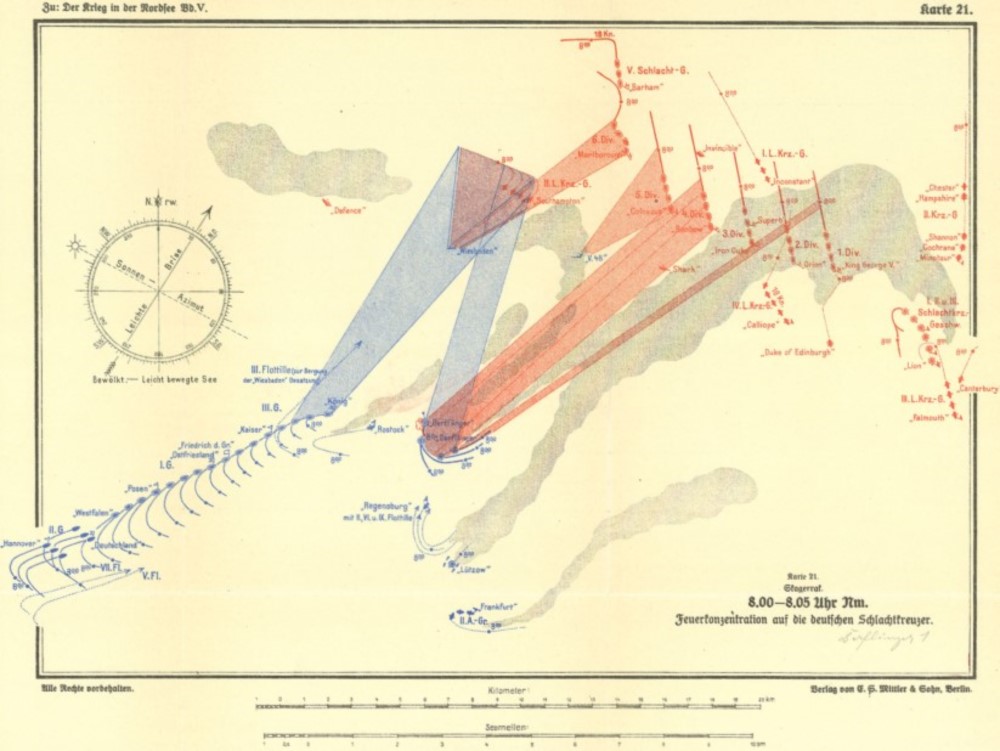
Goodenough spotted the turn and reported it to Jellicoe at 2000. Jellicoe intercepted, placing his line across Scheer’s course again, the battle being rejoined at around 2010. By 2015, the British were shooting even more effectively than they had earlier, and the German van began to buckle even before Scheer ordered another turn away at 2018.3
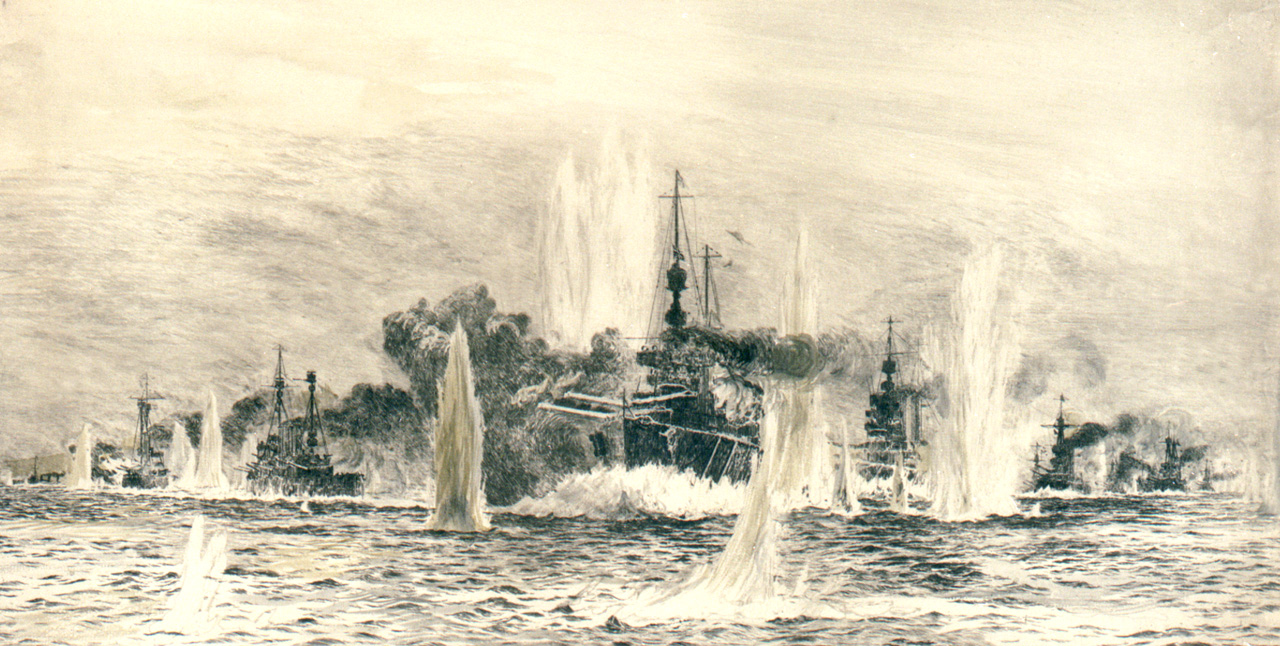
This was covered by the German battlecruisers and destroyers, in an action known as the ‘death ride’.4 This charge, into probably the heaviest concentration of naval gunfire the world has ever seen, has been described as ‘the most splendid and least intelligent moment in the short history of the Imperial Navy’. It did achieve the objective of drawing off the British fire from the turning battleships, and the battlecruisers closed to within 4 miles of the British before turning away, covered by the torpedoes of their escorting destroyers.
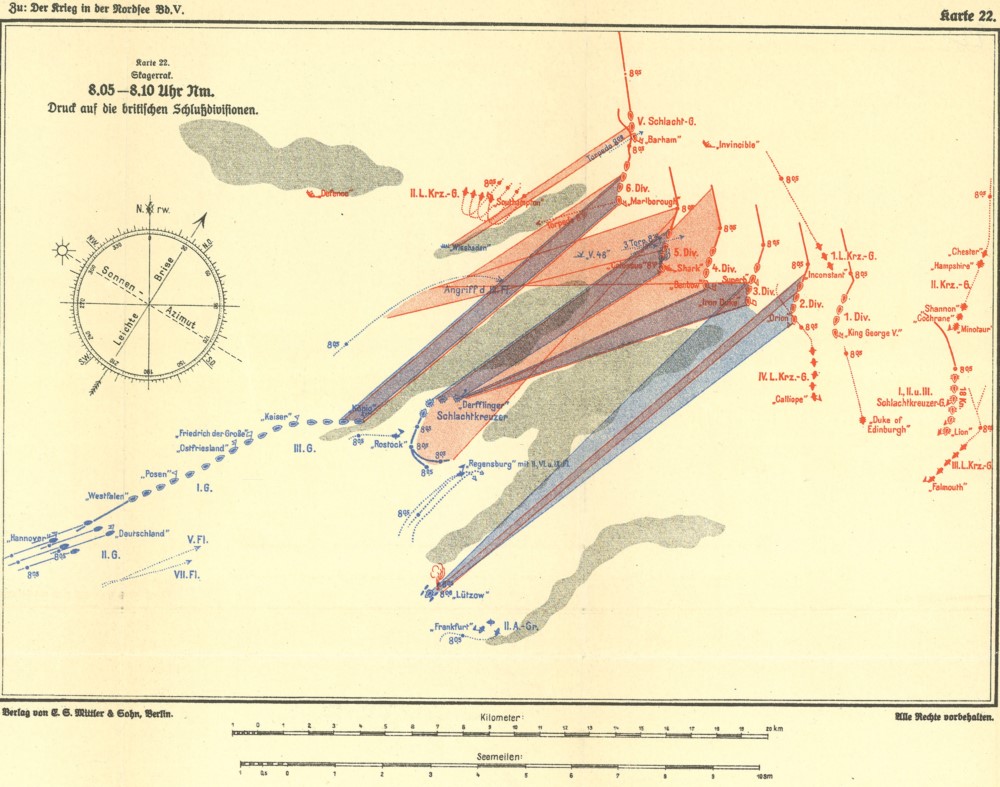
Before firing ceased around 2030, the British had managed to land 25 hits on the German battlecruisers and 12 on their battleships, while of the British ships, only Colossus was hit, taking two shells from Seydlitz.
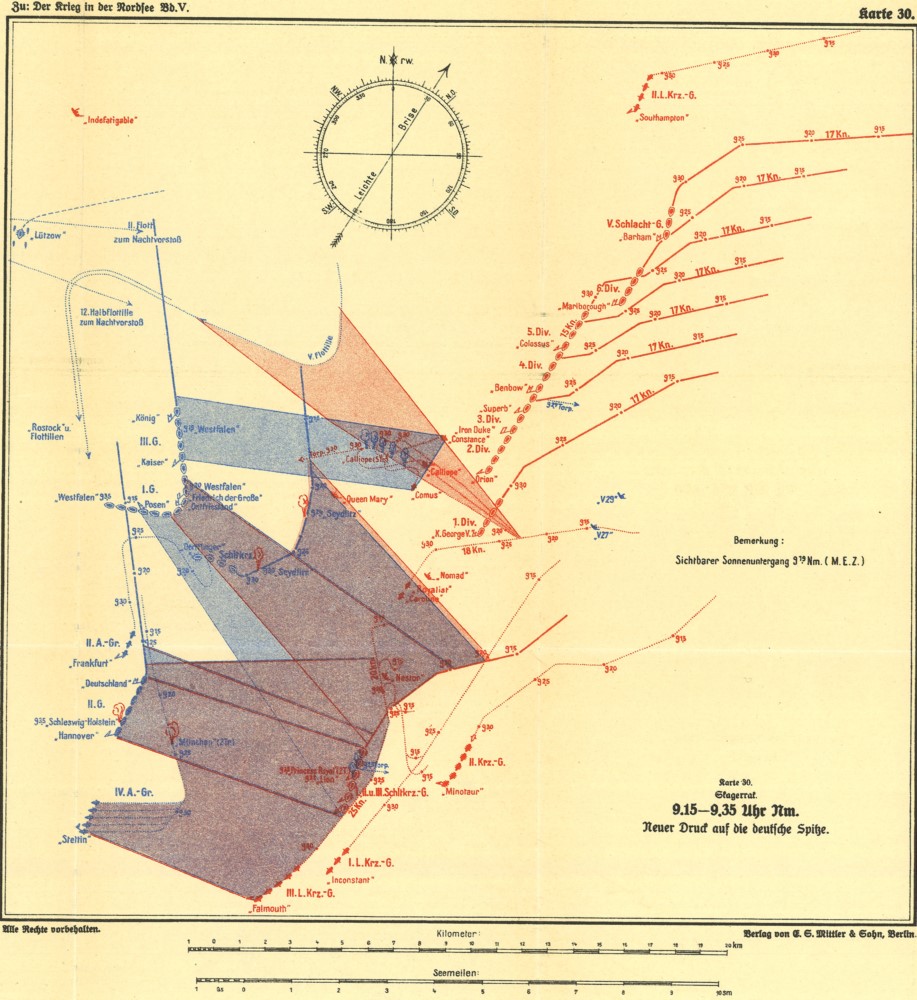
At this point, we come to the most controversial moment of the battle. The first German destroyer attack, by 13 boats, was launched at 2015, six minutes before Scheer gave the order for his torpedo craft to go in. This first wave launched a total of 31 torpedoes between 2022 and 2030, with the loss of one boat and four others badly damaged.5 Not one torpedo hit, as Jellicoe ordered his ships to turn away at 2021, presenting a smaller target to the torpedoes, extending the range they had to run, and giving his ships a better chance to dodge. This turned out to be a wise precaution. By the time the torpedoes reached the fleet, they were running very slowly, and at least 11 ships evaded them.

Some later claimed that he should have turned towards the torpedoes, a tactic that became common during WW2. However, one of the greatest fears the British had was that German destroyers would lay floating mines, which they would then lure the British over.6 A turn-towards, in addition to putting the fleet more at risk than the turn away, would have made this a real possibility.
Despite the volume of criticism leveled against Jellicoe,7 he had in fact written a letter to the Admiralty when he assumed command of the Grand Fleet in October of 1914, stating that he would turn away in this situation, to preserve the fleet. Even Churchill, despite his contemporary criticism,8 later recognized that Jellicoe “was the only man on either side who could have lost the war in an afternoon.”
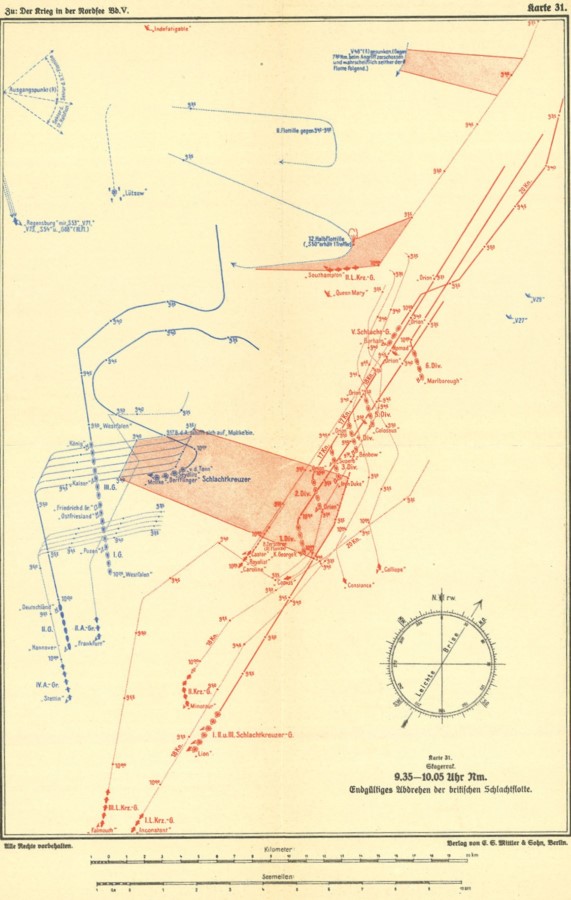
At this point, Jellicoe was blind again. His light cruisers were either holding station on him or beating off destroyer attacks. Even the usually-reliable Goodenough failed him, sending an erroneous message stating that the Germans were heading northwest. At 2050, Beatty suggested that the battleships follow his battlecruisers, who were in front of Jellicoe’s line. It is unclear why he did this, as he probably couldn’t see the Germans, either. Jellicoe agreed to give Beatty his leading division at 2101, although his leading division couldn’t even see Beatty at this point. He then sent his scouts directly west, in an attempt to bring the Germans to action before it was fully dark. At this point, Scheer had decided to head for Horns Reef, and was steering directly south, planning to try to get through the British fleet after nightfall.
At 2120 (a few minutes after the official time of sunset), Beatty found the German battlecruisers again. Hipper9 was in the process of transferring to Derfflinger when the British opened fire, obviously interrupting his attempt. Again, visibility hindered the Germans, and the British landed six hits on Hipper’s ships, putting Derfflinger’s last turret out of action, and taking only one 5.9” hit in return. The German line had been reversed, and was being led by the pre-dreadnoughts of the 2nd Battle Squadron. These came within range of the British, taking two hits and having no more success than the battlecruisers, although the Posen of the following 1st Battle Squadron did land one hit on Princess Royal. Finally, the mist descended around 2140, and the clash between the dreadnoughts had drawn to an end.
As a side note, the officer in command of A Turret aboard HMS Collingwood was Prince Albert, later known as George VI. He was proud of being in action there, but sad that Collingwood did not take any hits ‘as she had nothing to show that she had been in the fight’.10 This was a common sentiment among the officers and men of the Grand Fleet, and Beatty used the lack of damage to claim that they had not actually been in action.
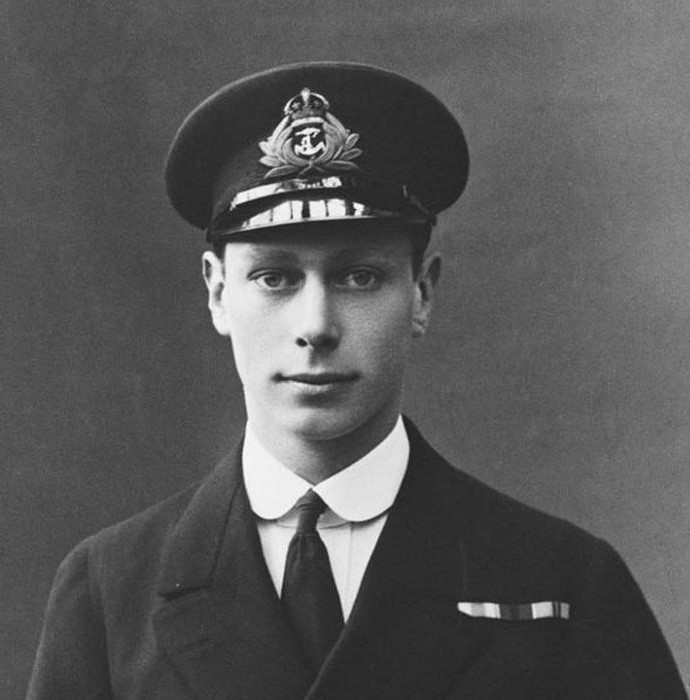
The future George VI at about the time of Jutland
As darkness fell, Scheer still faced the challenge of getting the High Seas Fleet past Jellicoe and into the safety of Wilhelmshaven. Next time, we'll examine the night action that closed the battle.
1 Excluding the 5th BS. ⇑
2 Lutzow had been damaged badly enough that she was sent home independently at this point. ⇑
3 He actually raised the flag to prepare for this turn at 2012, but delayed the execution for 6 minutes. ⇑
4 This is a bit odd, as the loss of a few destroyers should hardly merit this name. ⇑
5 The second wave didn’t even manage to find the British in the mist on the North Sea. ⇑
6 The Japanese had made use of this tactic during their war with Russians a decade earlier, so it wasn't an idle worry. ⇑
7 Some said that he was motivated by a fear of drowning, caused by his near-miss when Victoria sank ⇑
8 He initially suggested that Jellicoe should have used a completely new maneuver to deploy on the center during his first deployment, which makes no sense at all. This is unfortunately common when dealing with Churchill on naval matters. ⇑
9 Who had left Lutzow when she was disabled for a destroyer. ⇑
Recent Comments